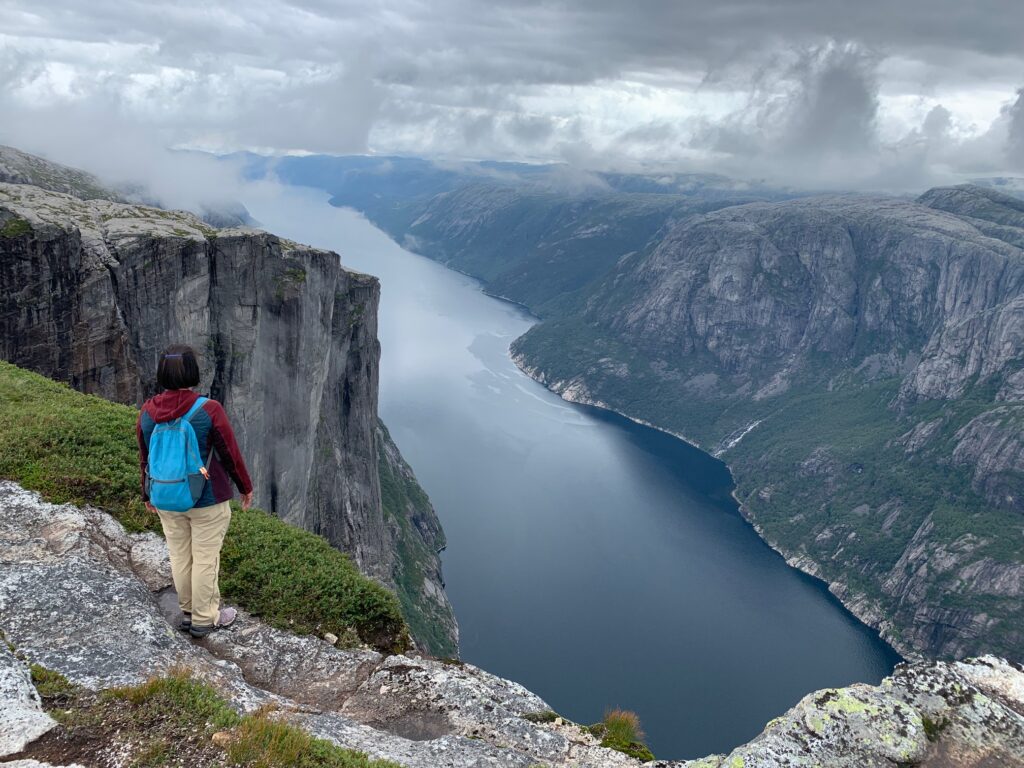
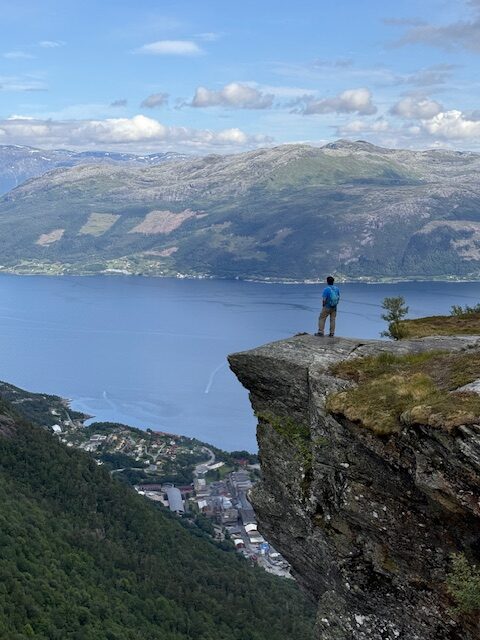
Looking at Lysefjord after hiking to Kjeragbolten
Highlights
Ten epic day hikes in Norway
Time of Visit: July-August 2024
Duration of Visit: 42 days
Description
Norway is a hiker’s paradise. The country’s fjords and mountains provide breathtaking and unique sceneries.
The list of hikes here are by no means inclusive. There are probably much better hikes than what is listed here. There are just so many wonderful places in Norway to explore and see such that a mere 42 days is not enough.
Here we list our top ten epic hikes. The hikes are arranged by geographical location, starting from the south and heading north.
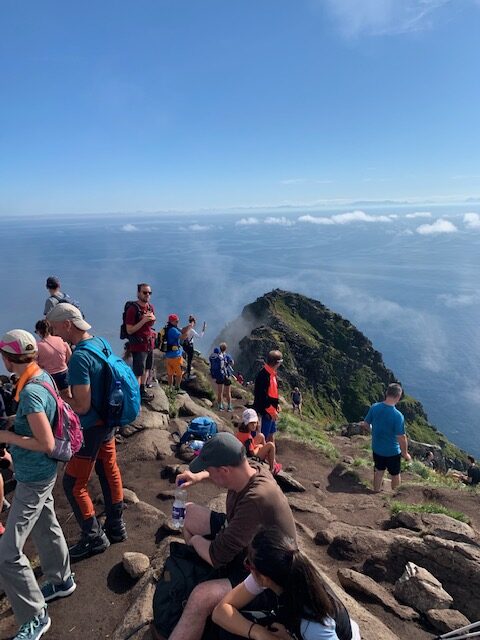
1. Kjeragbolten

Distance: 9.6 kms (6 mi), out and back
Elevation gain: 583 m (1,910 ft)
Rating: Hard
Time needed: Six to ten hours, including stops
Base: Lysebotn
Kjeragbolten is the famous big boulder wedged in between a narrow craggy opening. People hop on to this boulder for a once in a lifetime photo. It is not for the faint of heart or those who have fear of heights. Just be sure-footed and exercise extreme caution before stepping on to the boulder as a fatal mistake may be your last. It is a long fall to Lysefjord below.
The hike begins at Kjerag parking lot which is just before the narrow and winding road with 25 hairpin turns to Lysebotn. For cars, it is free to park for less than two hours and 300 NOK ($30) if longer. Credit card payment only.
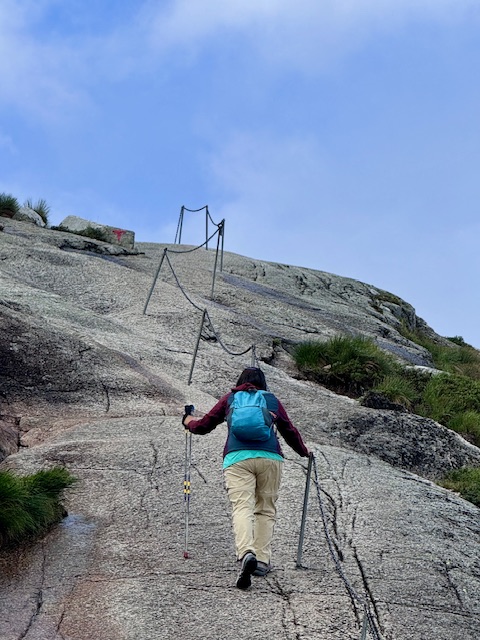
The route is mainly over granite mountain surface. There are three ascents, and two descents on the way to the famous boulder. Chains are provided on the steep sections of the trail over the granite rocks. To us, the chains are more useful on the downhill than uphill. It is also better and easier to walk backwards while holding on to the chains on the way down instead of facing forward.
A seasoned hiker can probably complete the entire hike in about four hours. We found that the first ascent is the hardest as it felt the steepest. That is probably why there are so many chains in this section of the hike. It seemed the next two ascents were easier.
Click on this link for an Instagram video of this hike: https://www.instagram.com/reel/C-M6rP6AWQP/?utm_source=ig_web_copy_link
2. Preikestolen (Pulpit Rock)
Distance: 8 kms (5 mi), out and back
Elevation gain: 396 m (1,300 ft)
Rating: Moderate
Time needed: At least five hours, including stops
Base: Jørpeland
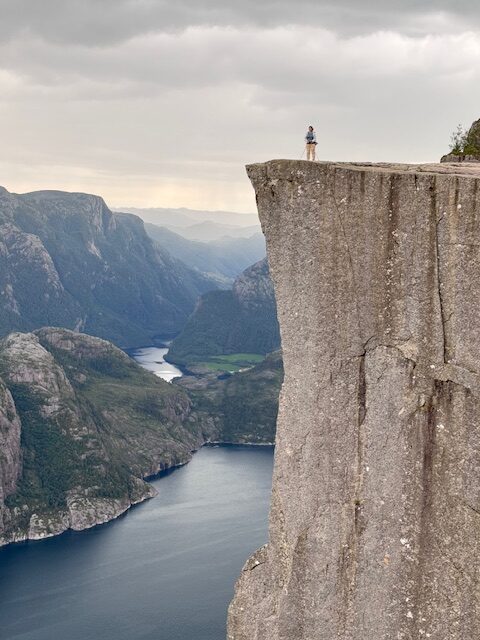
Preikestolen is the famous flat top rock overlooking the Lysefjord. People flock to this popular destination for two reasons. One is the amazing fjord view and the other is to capture the moment on camera as they stand or sit precariously at the cliff’s edge.
The hike to Preikestolen begins at the P1 parking lot at the end of Preikestolvegen road (P2 was closed during our visit which sits higher than P1). For cars, it is free to park for less than two hours and 250 NOK ($25) if longer. Credit card payment only.
We arrived at 4 PM at P1 and there were some available parking spots but definitely still a lot of parked vehicles. Preikestolen, along with Reinebringen in Lofoten are probably the two most popular hikes in Norway. Expect to share the trail with a lot of people unless you go there very early or very late.

The trail is considered moderate with four uphill sections. The first three are steep but have flat surfaced stone steps. This makes the route less precarious to navigate. The last uphill section is on natural granite surfaces but less steep compared to the first three. Boardwalks are installed over boggy and marshy sections giving the legs and knees a short break from the stress of going uphill or downhill.
We were able to reach Preikestolen in about two hours which is the average time indicated in Alltrails. There were people faster than us and also slower than us. We did it in a slow pace as we were still feeling the strain from the Kjeragbolten hike the day before. We took our time on the return trip to the parking lot and finished in about 1:45. Overall, expect the entire trip to take between 3.5 to 4 hours, not including the time spent at the famous rock.
Getting to Preikestolen from Lysebotn
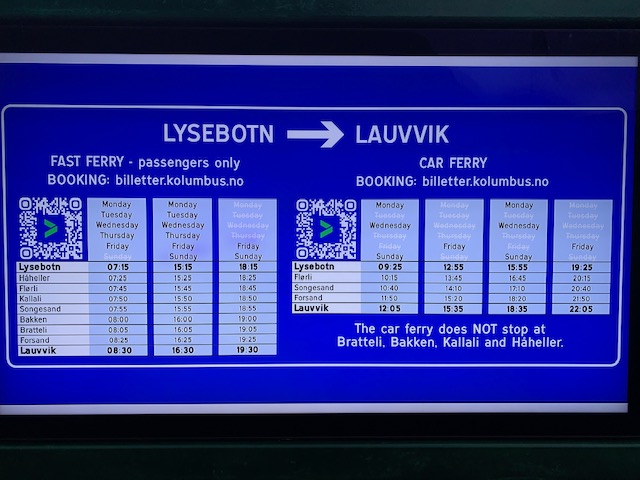
There are two ways to reach Preikestolen from Lysebotn. One is to drive which takes 3.5 to 4 hours while the other is to take a ferry that goes between Lysebotn and Lauvvik.
The driving option will take you through some toll roads and a long undersea tunnel between Stavanger and Tau (cost around 167 NOK). If you take the ferry, you have to get off at Forsand where you can take a bridge to get on the right side of the fjord to Preikestolen. The ferry does not run on Saturdays and even more limited sailing times for cars which only runs on Mondays, Wednesdays, Fridays and Sundays. See https://billetter.kolumbus.no/no for more information.
3. Trolltunga

Distance: 27 kms (16.6 mi) from P2 (Skjeggedal), out and back
Elevation gain: 1,220 m (4,000 ft)
Rating: Hard
Time needed: All day
Base: Odda

Don’t let the above hike statistics discourage you from doing this epic hike. There is a way to shorten the distance and significantly reduce the elevation gain which will be described later.
Trolltunga or troll’s tongue is a granite slab that overhangs above Ringedalsvatnet. This would be the most epic of hikes we did in Norway. The view is just magnificent. I think the picture above speaks for itself and why you should include Trolltunga in your bucket list.
Trolltunga is a very popular hike. On busy days, the line to have photos taken on the overhang slab can be as long as a 40 minute wait. But it is well worth it. Go there early if you want to beat the crowd. Or you can camp nearby to increase your chances of having the place all to yourself once all the day hikers have left.
The official trail starting point is Skjeggedal or P2 (parking lot 2). From P2, the trail traverses the narrow road that immediately ascends in elevation for 3.5 kms (2.1 mi) until it reaches P3 or Mågelitopp. It involves a 400 m (1,300 ft) gain between P2 and P3.
From P3, the trail eases on the incline until 5 km later where it involves a steep ascent of 350 m (1,150 ft) for about 2 kms (1.2 mi). Once you reach the 7 km mark from P3, it is pretty much an undulating route with ups and downs that are no longer steep nor difficult to the destination.
There is a shuttle bus from the town of Odda to P2. Seats on the bus can be booked on-line or it can be purchased from the driver as there is a credit card reader on the bus. I booked a round trip seat and took the earliest at 5:45 AM leaving from Trolltunga Campground and leaving P2 at 6PM back to the campground. The bus driver only issues one-way trips for those who did not have any reservation. The round trip cost was 350 NOK.
It will cost you 500 NOK to park at P2, 300 NOK for the parking and 200 NOK for the toll road between P1 and P2. It it cheaper to drive to P2 than take the bus if there are two or more in your party.
How to Shorten the Hike

Getting to P3 either by driving or by shuttle will significantly reduce the elevation gain and knock off 7 kms (4.3 mi) from the hike. Parking spaces in P3 are limited but can be reserved on-line. The cost is 500 NOK plus the toll road payment of 200 NOK between P2 and P1.
There is a shuttle service between P2 and P3 which costs 150 NOK per trip per person. The shuttle service can also be reserved on-line. The shuttle service accommodates walk-ins, albeit, the ones who have reservations are prioritized first. Cash or credit cards are accepted.
4. Vikedalsnebbet
Distance: 3.5 kms (2.2 mi), out and back
Elevation gain: 280 m (920 ft)
Rating: Easy
Time needed: 2.5 hours
Base: Alvik
If you missed going to Trolltunga, this is your other chance to have a similar experience. Vikedalsnebbet is like a mini-Trolltunga with a similar view, a shorter rock outcrop but a much easier and shorter hike.
The trailhead is at the end of 4.5 km dirt road that begins about 1 km west of the town of Alvik. There is a small parking area, probably large enough to accommodate about a dozen vehicles. You have to pay to park but the payment box is at the start of the dirt road on your left. There is no credit card reader so you have to pay with cash, bank transfer or on-line payment app called Vipps. Cost was 60 NOK during our visit.
There is a trail sign at the parking lot. Then just follow the red dots on rocks. The trail has two climbs. On the second climb, look for a stack or rocks (cairn) on top of a hill. The cairn should be on your right as you continue on the trail. Soon after the cairn, you will see a trail sign pointing to Vikedalsnebbet. The picture spot is about 100 m (330 ft) from the trail sign.
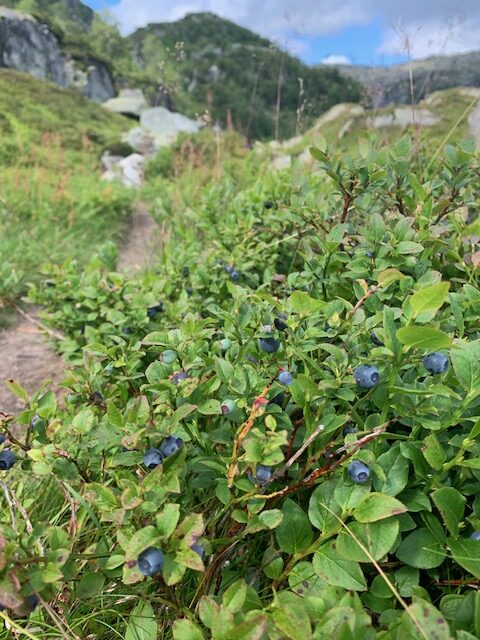
The trail was not heavily used during our visit. We only ran into two other parties and that was about it. The trail went through patches of wild blueberries that were ripe for picking. Though the berries were small and a little on the tarty side, it was still fun to pick and eat.
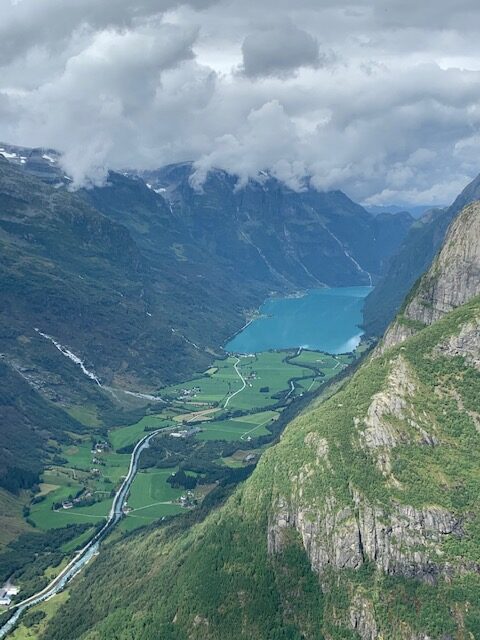
5. Molden
Distance: 8 kms (5 mi), out and back
Elevation gain: 610 m (2,000 ft)
Rating: Moderate
Time needed: All day (it is hard to leave)
Base: Gaupne or Sogndal
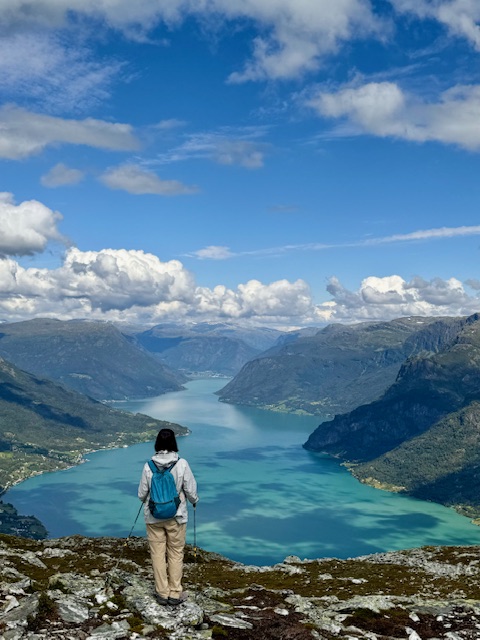
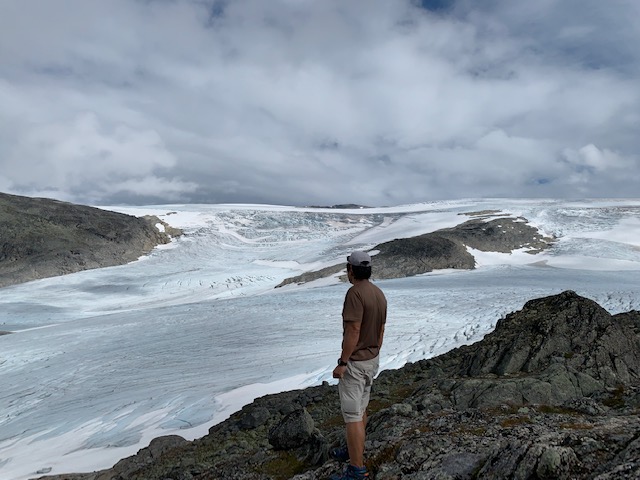
This hike is a popular hike for good reasons. It provides terrific views of distant snow capped mountains and epic views of the teal colored Lustrafjorden.
From the parking lot, the trail immediately climbs in elevation. It is not super steep but will certainly get your heart pumping and warm you up quickly. Fortunately, the first half of the trail is through the woods where shade is plentiful in the morning.
The trail opens up midway as it gets above the treeline. Lustrafjorden now becomes visible such that it is irresistible to stop and take photos. By all means, do so as the hard climb is ahead just past an old cabin. The climb does not let up until reaching the Molden rock cairn which signifies the highest point on the mountain.

There is really not much view at Molden peak. But venture towards the east and you will be rewarded with terrific views of Lustrafjorden. And if you find the right spot, you will have a fjord to the left, in front and to the right of you. On a clear and sunny day, the scenery just does not get any better.
6. Tuftebreen
Distance: 3 km (1.8 mi), out and back
Elevation gain: Tuftebreen – 400 m (1,300 ft)
Rating: Moderately hard
Time needed: 3-4 hours
Base: Gaupne
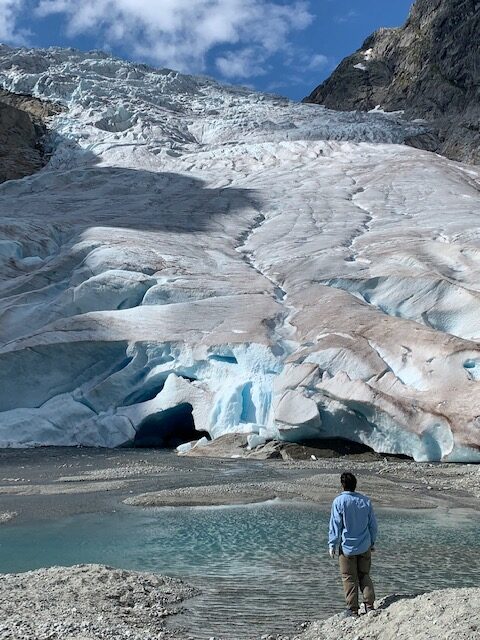
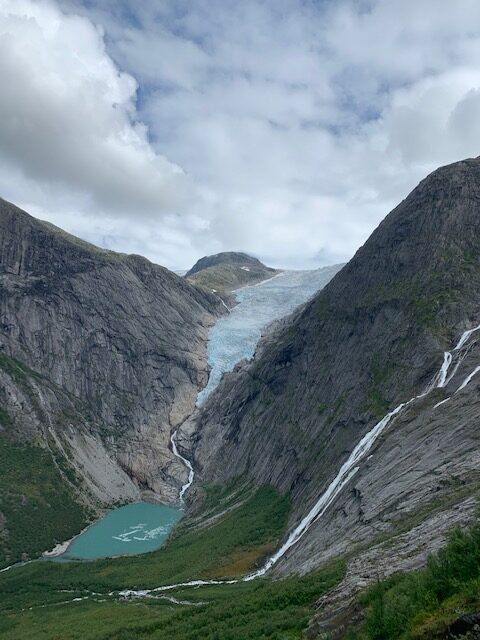
“Breen” in Norwegian means glacier. Tuftebreen is one of the tongues of the massive Jostedalsbreen, the largest glacier in mainland Europe. It is one of the few glaciers that you can physically touch as there is no lake in front of it, just a shallow river fed by its melting ice water.
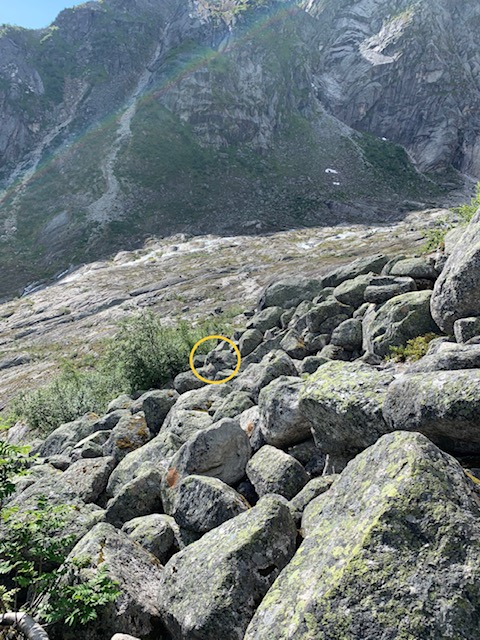
The trail to Tuftebreen shares the first few hundred meters with the trail to Bergsetbreen. Once on the actual Tuftebreen trail, it becomes narrow and ascends continuously without any break for about a kilometer before it flattens somewhat near the plateau. The trail briefly disappears when you reach a boulder section about 100 feet long. There are a series of stone cairns that you can follow all the way to the glacier tongue after the boulder section.
The air temperature at the base of the glacier is much cooler than at the trailhead. You may need to put on a jacket to be comfortable especially when it is windy.
The trailhead parking lot is rather small, perhaps accommodating around 20 vehicles. The road leading to the parking lot is too narrow for overflow parking so it is best to arrive early to secure a parking spot. To reach the parking area, take FV334 at the bridge over the Jostedøla River before the town of Gaupne. FV334 follows the river until it reaches the village of Gjerde. Take a sharp left onto FV335 that eventually ends near the parking lot.
7. Kattanakken
Distance: 9.6 kms (5.9 mi), out and back
Elevation gain: 1,100 m (3,600 ft)
Rating: Hard
Time needed: 6 – 8 hours
Base: Olden
This is a very challenging hike but with tremendous rewards. The trail description at the parking lot states that the trail is not maintained and there are few waymarks along the way. It also talks about climbing on smooth rocks and should be attempted by experienced hikers.
Yes, the trail is not maintained but that’s what it is – a trail. Yes, there are no signs along the trail, but there are rock cairns and red painted rocks here and there to follow. The trail is also well worn such that an experienced hiker would be able to follow it. The only part where the trail disappears is at the rock slide past the two waterfalls about an hour into the actual trail. The rock slide is about 100 feet wide. Just look for the rock cairn at the other side. Do not make the mistake I made where I went up instead of across because I followed what I thought was the trail instead of taking the time to look for the cairn first.
The vegetation would start to thin out after the rock slide and the trail begins to open up. Tremendous views of the valley below start to reveal itself and gets better as you get higher.
You do not need to bring trekking poles here as you will need both of your hands to scramble over rocks. The rocks are rough and grippy when dry but could be a different matter if it is wet.
At the end of the trail, you will be above the clouds, have a 360 degree view and be peering on the ice fields on top of the mountain. It is a place like no other.
Take your time on the way down. It is more physically demanding on the knees to go down than up. You may find that you have to grab on to branches for stability during the descent.
To reach the Kattanakken trailhead, take the Birksdalbreen trail and follow it to Kleivafossen (the powerful waterfall). Take the trail on the right past the waterfall and you will see the trailhead less than a kilometer later. You have gone too far if you reach the bridge.
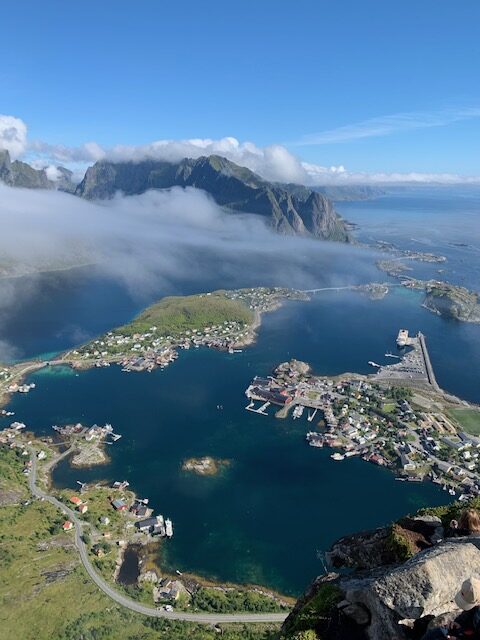
8. Reinebringen
Distance: 2.2 kms (1.35), out and back
Elevation gain: 484 m (1,587 ft)
Rating: Hard
Time needed: 3 – 5 hours
Base: Reine, Moskenes
Reinebringen is one of the most iconic hikes in the Lofoten Islands. It offers one of the breathtaking views in the region. The hike is famous for its spectacular vantage point overlooking the picturesque fishing village of Reine, with its red and white cabins set against a backdrop of steep mountains and deep blue fjords.
This is a very popular hike like Prieskestolen. Expect to share the mountain peak with a couple of hundred people unless you go really early or really late. The peak is also frequented by clouds that seems to stubbornly cling around it. This significantly obscures the view of the surrounding mountains, fjord and Reine. Clouds form at all hours and hang around for a while. As such, allow yourself plenty of time at the top so you may catch infrequent breaks in the clouds and be able to capture clear photos.
There is limited free parking alongside the road. These are mostly taken by campers and campervans that have staked the spots the night before. There is paid parking in Reine. This adds approximately another 2 kilometers to the hike. Fortunately, it is flat from the parking lot to the trailhead..
The sign at the trailhead indicates 1.1 km to the summit. As soon as you make that first step at the trailhead, you will be on a never ending stairmaster until you reach the first viewing area. Altogether, there are 1,978 continuous steps to the first viewing area. Then it is a short climb to the top on dirt and natural rock.
Reinebringen is a must-do for those visiting Lofoten. It offers the perfect combination of adventure and breathtaking natural beauty.
9. Djevelporten (Devil’s Gate)

Distance: 3 kms (1.85), out and back
Elevation gain: 397 m (1,305 ft)
Rating: Hard
Time needed: 3 – 4 hours
Base: Svolvær
If you missed Kjeragbolten, Djevelporten provides another chance to step on a big rock wedged in a mountain crevice. The rock creates a natural “bridge” or gate. Hikers that stand on the rock are rewarded with breathtaking views of the surrounding fjords and mountains. Setting foot on top of the rock is both thrilling and unnerving which makes it a memorable experience.
The hike to the Instagram worthy spot is a lot shorter than Kjeragbolten and less demanding. Still the hike is considered hard due to the trail’s steepness and rock scrambling.
The trail starts from the base of Fløya Mountain at the pay parking area. From there, it immediately ascends on stone steps for about half a kilometer. The next 0.8 km is then over dirt and boulders which require some scrambling. Once the trail opens up, it provides a nice view of the Svolvær and the surrounding mountains. The nicely laid stone steps resume at the final 0.2 km to the sought after rock.
The journey is relatively short but requires good physical condition due to the elevation gain and rugged terrain. The hike is best done in good weather, as wet conditions can make the rocks slippery and the sought after views can get obscured by clouds. Djevelporten is a must-do hike for visitors to the Lofoten Islands.
10. Mt. Hesten
Distance: 4 kms (2.9 mi), out and back
Elevation gain: 540 m (1,774 ft)
Rating: Hard
Time needed: 3 – 6 hours
Base: Fjordgard
The Mt. Hesten hike is a must do for those visiting Senja Island This short hike provides amazing views of fjords and surrounding mountains. It is one of the most iconic and rewarding treks in northern Norway. It is worth mentioning that you can spend months in Senja Island because it has plenty of beautiful hikes that provide epic views similar to Mt. Hesten.
Rising to 556 meters above sea level, the hike offers breathtaking panoramic views of the famous Segla mountain, the fjords, and the rugged coastline of Senja. The trail, while relatively short, is steep and can be challenging, especially near the summit, where the path becomes narrow and exposed. Though a strenuous hike, the stunning views make every step worthwhile.
Mt. Hesten is best hiked during dry conditions as the trail’s steepness poses risks of slips and falls when wet, especially during the descent. Plus the scenery up in the summit is at its best on clear and sunny days.
This hike can easily be extended by also hiking the adjacent Mt. Stavelitippen to the north (to the right as you are hiking up) and the ridge between Mt. Hesten and Mt. Segla. The views are equally stunning.
A seasoned and fit hiker can do the round trip hike in about two hours. But allow yourself plenty of time as the scenery is just spectacular that you just do not want to leave.
There are two pay parking lots in village of Fjordgard, one to the north and one to the south. The huge north parking lot is closer to Mt. Hesten trailhead. You have to enter the vehicle license number and the number of hours you intend to park. Best to be generous in your estimate so you are not in a hurry and have enough time to enjoy the scenery.
A few words about hiking to the top of Mt. Segla. I would have included Mt. Segla to this list but it is a terrible hike. Yes, the views on top of Mt. Segla are fantastic but the way to get there makes it not worth it. The last 0.8 kms is straight up on the side of the mountain that is probably steeper than 45 degrees in most places. Plus there is no established trail that switchbacks the mountainside making the descent really dangerous.
Summary
Norway is blessed with beautiful fjords and majestic mountains that makes it a hiker’s paradise. For sure, this Scandinavian country has more epic day hikes than what is listed in this article. On that same note, there is a high likelihood that there are other hikes that are as epic or even more than the ten described here.
Where else can you stand on top of a big rock wedged between a mountain crevice several hundred meters up in the air like Kjeragbolten and Djevelporten? Where else can you hike to a glacier and be able to touch it like Tuftebreen? Or able to feel like a bird soaring in the sky when you reach the top of the Reinebringen hike.
All of the day hikes described here are short but most are challenging. All have significant elevation gains that will get the heart rate going and the adrenaline pumping. But these day hikes are worth the sweat, aches and pain because they provide views and experiences that are out of the ordinary.